はじめに
こんにちは、@hiro128_777です。
今回は、Cocos Sharp 1.7 以降に対応した iOS でタイトル画面を表示する方法についてご説明します。
※これから Cocos Sharp をはじめる方は 1.7 以降をご利用ください。
既に、Cocos Sharp 1.6.2 をご利用の場合以下をご覧下さい。
hiro128.hatenablog.jp
iOS でタイトル画面を表示
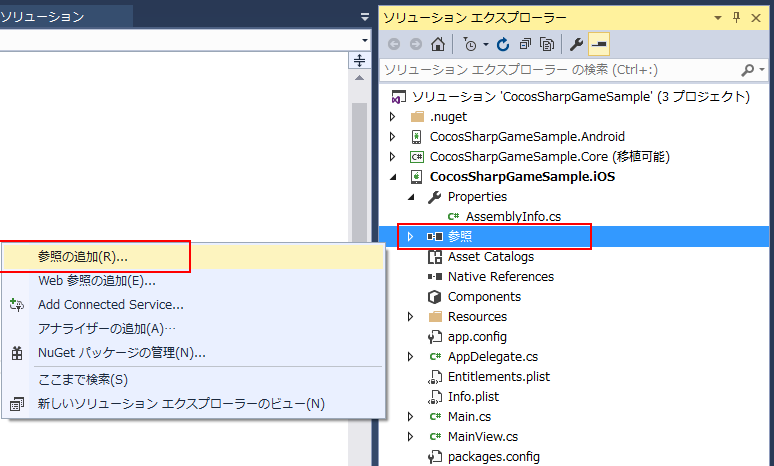
まずは、CocosSharpGameSample.iOS プロジェクトに CocosSharpGameSample.Core プロジェクトの参照を追加します。
CocosSharpGameSample.iOS プロジェクトの参照設定を右クリックし、参照の追加をクリックします。
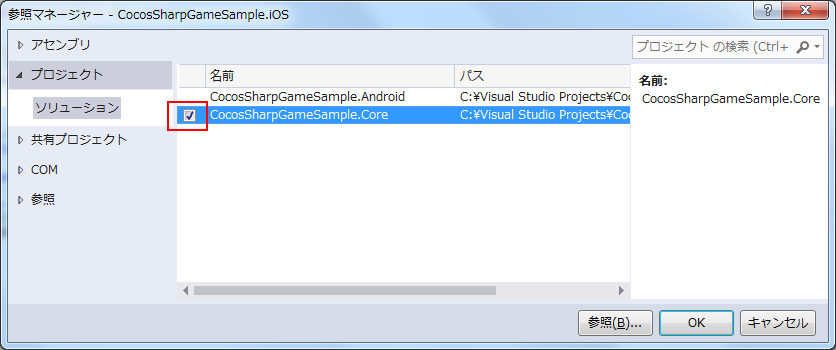
CocosSharpGameSample.Core にチェックを入れ、OKをクリックします。
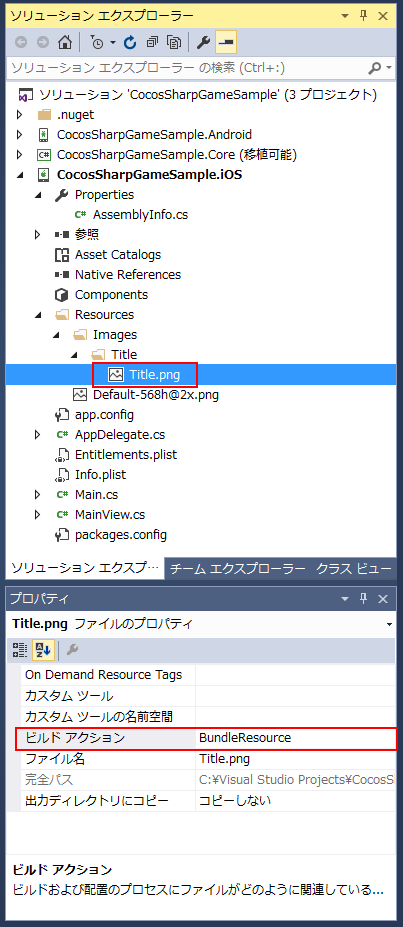
次に CocosSharpGameSample.iOS プロジェクトの Resources/Images/Title/ にタイトル画面の画像を配置します。
画像ファイルのビルドアクションは「BundleResource」にします。

↑この画像を使っています。
次に CocosSharpGameSample.Core プロジェクトの Layers に TitleLayer.cs を追加します。

TitleLayer.cs では、画面にタイトル画像を配置します。
using CocosSharp;

namespace CocosSharpGameSample.Core
{
	public class TitleLayer : CCLayerColor
	{

		protected override void AddedToScene()
		{
			base.AddedToScene();
			// タイトル画像を配置
			var title = new CCSprite("/Resources/Images/Title/Title.png", null);
			title.Position = new CCPoint(ContentSize.Center.X, 200);
			AddChild(title);
		}

	}
}
次に CocosSharpGameSample.Core プロジェクトの ルートに GameDelegate.cs を追加します。
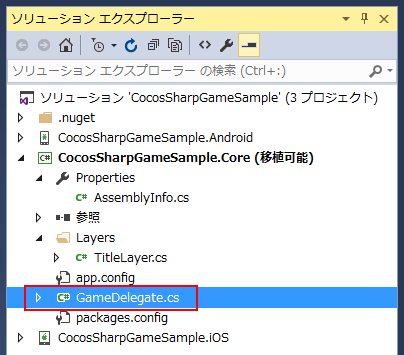
GameDelegate.cs では、
ゲーム上の仮想解像度であるデザイン解像度の設定、
シーンにタイトル画面の作成、セットの処理、ゲームの開始処理を行ないます。
using System;
using System.Collections.Generic;
using CocosSharp;

namespace CocosSharpGameSample.Core
{
	public static class GameDelegate
	{
		public static void LoadGame(object sender, EventArgs e)
		{
			var gameView = sender as CCGameView;
			if (gameView == null) { return; }

			// デザイン解像度設定
			gameView.DesignResolution = new CCSizeI(224, 380);
			gameView.ResolutionPolicy = CCViewResolutionPolicy.ShowAll;

			// コンテンツパス設定
			var contentSearchPaths = new List<string>() { "Images", "Sounds" };
			gameView.ContentManager.SearchPaths = contentSearchPaths;

			// タイトル画面のシーン作成、セット
			var gameScene = new CCScene(gameView);
			gameScene.AddLayer(new TitleLayer());

			// ゲーム開始
			gameView.RunWithScene(gameScene);
		}
	}
}
次に CocosSharpGameSample.iOS プロジェクトのルートに MainView.cs を追加します。
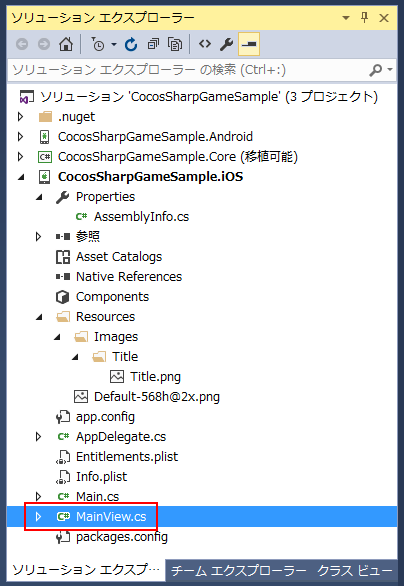
MainView.cs では、
UI上にゲーム画面のコントロールであるCCGameViewを配置し、ゲームの起動処理とひも付けます。
using CoreGraphics;
using UIKit;
using CocosSharp;
using CocosSharpGameSample.Core;

namespace CocosSharpGameSample.iOS
{
	public class MainView : UIViewController
	{
		CCGameView GameView { get; set; }

		public override void ViewDidLoad()
		{
			base.ViewDidLoad();

			GameView = new CCGameView(new CGRect(0, 20,
				UIScreen.MainScreen.ApplicationFrame.Width,
				UIScreen.MainScreen.ApplicationFrame.Height));
			GameView.ViewCreated += GameDelegate.LoadGame;
			View.AddSubview(GameView);
		}

		public override void ViewWillDisappear(bool animated)
		{
			base.ViewWillDisappear(animated);

			if (GameView != null)
				GameView.Paused = true;
		}

		public override void ViewDidAppear(bool animated)
		{
			base.ViewDidAppear(animated);

			if (GameView != null)
				GameView.Paused = false;
		}

		public override void DidReceiveMemoryWarning()
		{
			base.DidReceiveMemoryWarning();
		}

	}
}
最後に CocosSharpGameSample.iOS プロジェクトの AppDelegate.cs を変更し
アプリの起動時に、ゲーム画面を含むUIが表示されるようにします。
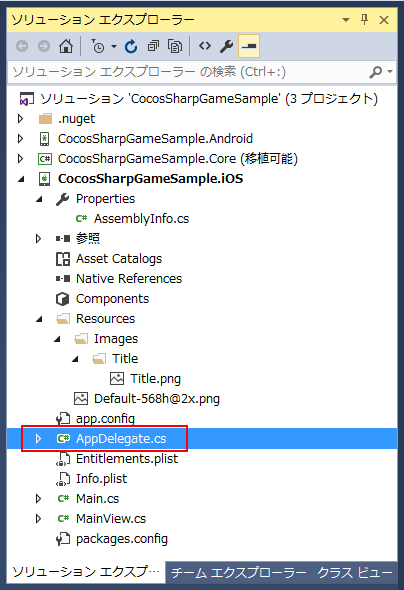
using Foundation;
using UIKit;

namespace CocosSharpGameSample.iOS
{
	[Register("AppDelegate")]
	public partial class AppDelegate : UIApplicationDelegate
	{
		public override UIWindow Window
		{
			get;
			set;
		}

		public override bool FinishedLaunching(UIApplication application, NSDictionary launchOptions)
		{

			Window = new UIWindow(UIScreen.MainScreen.Bounds);

			var viewController = new MainView();

			Window.RootViewController = viewController;
			Window.MakeKeyAndVisible();

			return true;
		}

	}
}
以上でプログラムが完成しましたので、Debug で起動するとタイトル画面が表示されます。

今回はここまでです。