今回やってみたこと
皆様 Xamarin.Forms というと業務アプリ的なイメージがあるかと思うのですが、なんと、CocosSharp for Xamarin.Formsを使うと、Xamarin.Formsの中にCocosSharpのゲームを同居できてしまいます。
というわけで今回は、CocosSharp for Xamarin.Forms で寿司を流すサンプルを作成してみました。
アプリの中に動きのあるコンテンツを利用したいときのご参考にでもなれば幸いです。
今回のサンプルのソースは以下をご参照ください。
作成方法
Xamarin Forms の新規プロジェクトを作成し、CocosSharp.Forms 1.7.1 のパッケージをインストールしてください。
※この辺りの詳細な方法については、たくさん情報がございますので割愛します。
概要

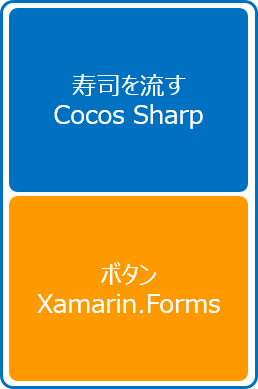
画面の構成は上の図のように、画面の上半分が Cocos Sharp のゲーム画面で、寿司が流れる部分となります。
下半分が Xamarin.Forms で操作するボタンが配置されています。
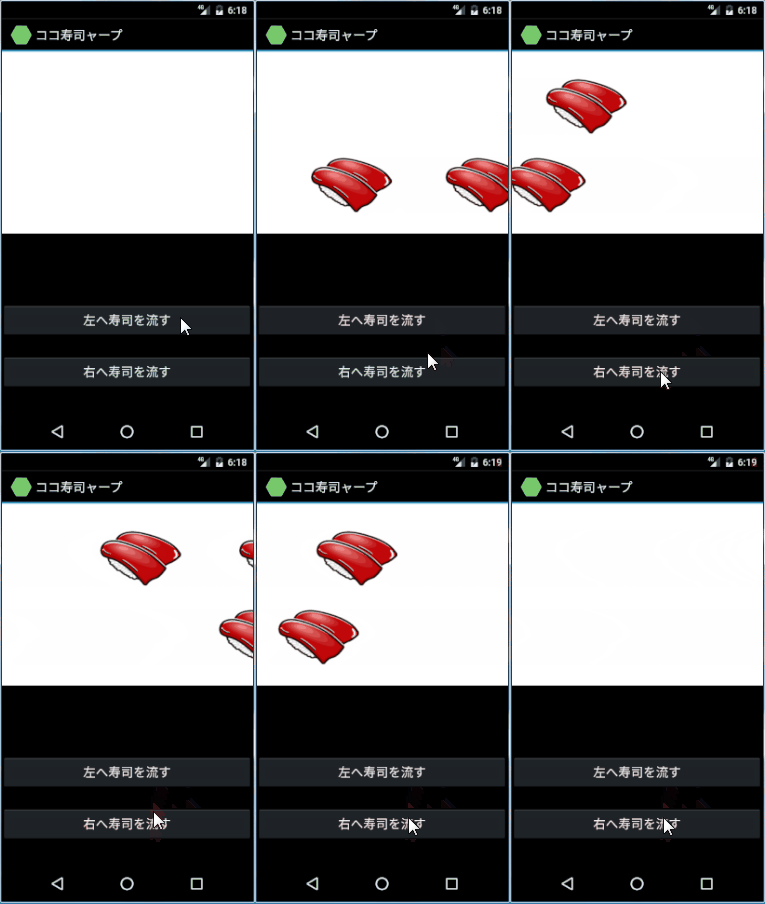
ボタンを1回押すごとにゲーム画面部分に寿司が1つ流れます。

XAMLの作成
<?xml version="1.0" encoding="utf-8" ?>
<ContentPage xmlns="http://xamarin.com/schemas/2014/forms"
			 xmlns:x="http://schemas.microsoft.com/winfx/2009/xaml"
			 xmlns:prism="clr-namespace:Prism.Mvvm;assembly=Prism.Forms"
			 prism:ViewModelLocator.AutowireViewModel="True"
			 Title="ココ寿司ャープ"
			 x:Class="CocosSharpFormsSample.Views.MainPage">
	<Grid x:Name="MainGrid" RowSpacing="0">
		<Grid.RowDefinitions>
			<RowDefinition Height="*"/>
			<RowDefinition Height="*"/>
		</Grid.RowDefinitions>
		<StackLayout Grid.Column="0" Grid.Row="1">
			<StackLayout Padding="0,100,0,0">
				<Button Text="左へ寿司を流す" Command="{Binding LeftCommand}" />
			</StackLayout>
			<StackLayout Padding="0,20,0,0">
				<Button Text="右へ寿司を流す" Command="{Binding RightCommand}" />
			</StackLayout>
		</StackLayout>
	</Grid>
</ContentPage>
XAMLは通常の Xamarin.Forms の場合と何も変わりません。上下2段のGridが配置してあり、下のセルにボタンが2つ配置されています。
CocosSharp のコントロールは XAML 上には配置されていません。CocosSharp のコントロールは XAML 上で追加するとなぜか落ちるため、後ほどコードビハインドで追加します。
コードビハインド
using System;
using System.Collections.Generic;

using Xamarin.Forms;
using CocosSharp;
using CocosSharpFormsSample.ViewModels;

namespace CocosSharpFormsSample.Views
{
	public partial class MainPage : ContentPage
	{
		public MainPage()
		{
			InitializeComponent();

			var grid = this.FindByName<Grid>("MainGrid");

			var gameView = new CocosSharpView()
			{
				HorizontalOptions = LayoutOptions.FillAndExpand,
				VerticalOptions = LayoutOptions.FillAndExpand,
				ViewCreated = CocosSharpView_ViewCreated
			};
			grid.Children.Add(gameView, 0, 0);
		}

		private void CocosSharpView_ViewCreated(object sender, EventArgs e)
		{
			var gameView = sender as CCGameView;

			if (gameView != null)
			{
				gameView.DesignResolution = new CCSizeI(350, 300);
				gameView.ResolutionPolicy = CCViewResolutionPolicy.ExactFit;
				gameView.ContentManager.SearchPaths = new List<string> { "Images" };
				var gameScene = new GameScene(gameView);
				gameView.RunWithScene(gameScene);
				var viewModel = BindingContext as MainPageViewModel;
				viewModel.GameScene = gameScene;
			}
		}

	}
}
コードビハインドでは、InitializeComponentの後にCocosSharpViewのコントロールを作成し配置します。
また、コントロール作成時のイベントハンドラ内で以下のようにゲーム画面の初期設定を行っています。
gameView.DesignResolution = new CCSizeI(350, 300);
ゲーム内の仮想解像度を横350ユニット、縦300ユニットに設定する。
gameView.ResolutionPolicy = CCViewResolutionPolicy.ExactFit;
アスペクト比を保ったまま最大の大きさで表示する。
gameView.ContentManager.SearchPaths = new List<string> { "Images" };
アセットを探しに行くパスを設定する。
var viewModel = BindingContext as MainPageViewModel;
viewModel.GameScene = gameScene;
また、ViewModel側からゲーム操作できるように参照を渡しています。この部分本当は疎結合にしたいのですが、現状では厳しそうな感じです。
ゲームロジック
CocosSharp のゲームでは、CCSceneの中にCCLayerが存在し、その中にCCSpriteが配置されます。
最初にCCLayer上で寿司が流れるロジックを作成します。
using System;

using CocosSharp;

namespace CocosSharpFormsSample
{
	public class GameLayer : CCLayerColor
	{
		private CCTexture2D sushiTexture;

		public GameLayer(CCColor4B? color = default(CCColor4B?)) : base(color)
		{
			sushiTexture = new CCSprite("Sushi.png", null).Texture;
		}

		public void ConveyorShushiRightToLeft()
		{
			var sushi = new CCSprite(sushiTexture);
			sushi.PositionX = 401f;
			sushi.PositionY = 80f;
			var moveBy = new CCMoveBy(4f, new CCPoint(-500f, 0));
			var remove = new CCRemoveSelf();
			var sequence = new CCSequence(moveBy, remove);
			sushi.RunAction(sequence);
			AddChild(sushi);
		}

		public void ConveyorShushiLeftToRight()
		{
			var sushi = new CCSprite(sushiTexture);
			sushi.PositionX = -50f;
			sushi.PositionY = 210f;
			var moveBy = new CCMoveBy(4f, new CCPoint(500f, 0));
			var remove = new CCRemoveSelf();
			var sequence = new CCSequence(moveBy, remove);
			sushi.RunAction(sequence);
			AddChild(sushi);
		}

	}
}
ConveyorShushiRightToLeftConveyorShushiLeftToRightの各メソッドは、それぞれ「左へ寿司を流す」「右へ寿司を流す」ボタンを押したときに、画面外の領域に寿司を配置しそのまま画面上を寿司が流れ、画面外に到達したら寿司をGameLayerから削除する一連のアクションを実行します。
次に、作成したGameLayerをCCSceneに配置します。
using System;

using CocosSharp;

namespace CocosSharpFormsSample
{
	public class GameScene : CCScene
	{
		GameLayer layer;

		public GameScene(CCGameView gameView) : base(gameView)
		{
			layer = new GameLayer(CCColor4B.White);
			AddLayer(layer);
		}

		public void RightToLeft()
		{
			layer.ConveyorShushiRightToLeft();
		}

		public void LeftToRight()
		{
			layer.ConveyorShushiLeftToRight();
		}

	}
}
ViewModel
ViewModelでは、Xamarin.Forms側のCommandに従いCocosSharp側に指示を与えています。
using Prism.Commands;
using Prism.Mvvm;
using Prism.Navigation;

namespace CocosSharpFormsSample.ViewModels
{
	public class MainPageViewModel : BindableBase
	{

		public GameScene GameScene { get; set; }
		public DelegateCommand LeftCommand => new DelegateCommand(Left, CanLeft);
		public DelegateCommand RightCommand => new DelegateCommand(Right, CanRight);

		INavigationService _navigationService;

		public MainPageViewModel(INavigationService navigationService)
		{
			_navigationService = navigationService;
		}

		private bool CanLeft()
		{
			return true;
		}

		private void Left()
		{
			GameScene.RightToLeft();
		}

		private bool CanRight()
		{
			return true;
		}

		private void Right()
		{
			GameScene.LeftToRight();
		}

	}
}
以上で完了です。
では早速動かしてみましょう。
ボタンを押すと左右から寿司が流れました(笑)

まとめ
- CocosSharp for Xamarin.Formsを使うと、Xamarin.Formsの中の一部分としてCocosSharpのゲームを同居できます。
- Xamarin.Forms側からCocosSharpのゲームを操作することも可能です。
- Xamarin.Formsでは表現しきれない動きのあるコンテンツを利用したい時に有効です。
今回のサンプルのソースは以下をご参照ください。