個人的なメモ

Tomohiro Suzuki @hiro128_777 のブログです。Microsoft MVP for Developer Technologies 2017- 本ブログと所属組織の公式見解は関係ございません。

Swift, Objective-C を Xamarin.iOS に移植する際のポイント(1) デリゲート その1

はじめに

こんにちは、@hiro128_777です。

Xcode での開発経験がない方が、iOS の開発を Xamarin で始めてWebで情報を集めると、 Swift や Objective-C の情報はたくさん見つかりますが、Xamarin の情報は案外少ないことに気づきます。

そして、Swift や Objective-C のサンプルコードを見て、Xamarin に移植する必要が出てきますが、これは Xcode での開発経験がないと結構骨が折れる作業です。

今回から数回にわたり、Swift, Objective-C を Xamarin.iOS に移植する際のポイントをご説明します。

初回である今回は、デリゲートについてご説明します。

C# のデリゲートと iOS のデリゲートの違いについて

C#のデリゲートは安全にカプセル化された関数ポインタのようなもので、言語仕様として準備されている機能ですが、Swiftのデリゲートは言語仕様ではなくデザインパターンであり、設計手法の一つです。よって利用目的は似てるのですが、文法的にはまったく違うものです。

この違いがわかりにくいので、今回はデリゲートについてご説明します。
 

なお、iOS のデリゲートについては以下の公式ドキュメントも非常に参考になります。
docs.microsoft.com
 

Xamarin.iOS は、Swift ではなく、Objective-C に寄った設計です。

このことが、Swift のコードを Xamarin.iOS へ移植する際のハードルになっています。もちろん、Swift, Objective-C の開発経験があれば簡単なのですが、Windows の世界から来た方にはなかなか大変です(私もいつも苦労しています)。

プロトコルと Xamarin.iOS

標準ライブラリで定義済みのデリゲートは、プロトコルと一緒に利用されます。

プロトコルは、C#の世界のインターフェースとほぼ同じと考えていただいて結構です。iOSの世界では、標準ライブラリに様々なプロトコルが定義されています。

では、標準ライブラリのプロトコルを利用したデリゲートの実装を詳しく見ていきましょう。

今回は写真撮影のサンプルアプリを題材にします。

以下よりサンプルコードをダウンロードして下さい。
developer.apple.com

その中の、PhotoCaptureDelegate.swiftファイルのコードを見てみましょう。
クラスの定義部分に注目すると、

class PhotoCaptureProcessor: NSObject {
extension PhotoCaptureProcessor: AVCapturePhotoCaptureDelegate {


とあります。

ここに出てきているAVCapturePhotoCaptureDelegateは定義済みのプロトコルです。

Swift でAVCapturePhotoCaptureDelegateのように定義済みのプロトコルが利用されている場合、基本的には Xamarin.iOS 側には対応する interface および class が準備されています。
interface は Swift のプロトコルの名前の頭に 「I」 を付けた名前、class は Swift の Protocol の名前と同名になっています。

例えば、Swift のAVCapturePhotoCaptureDelegateに対応する Xamarin.iOS の interface はIAVCapturePhotoCaptureDelegate、class はAVCapturePhotoCaptureDelegateです。

では、IAVCapturePhotoCaptureDelegateのメタ情報を見てみましょう

namespace AVFoundation
{
    [Introduced(PlatformName.iOS, 10, 0, PlatformArchitecture.None, null)]
    [Protocol(Name = "AVCapturePhotoCaptureDelegate", WrapperType = typeof(AVCapturePhotoCaptureDelegateWrapper))]
    [ProtocolMember(IsRequired = false, IsProperty = false, IsStatic = false, Name = "WillBeginCapture", Selector = "captureOutput:willBeginCaptureForResolvedSettings:", ParameterType = new[] { typeof(AVCapturePhotoOutput), typeof(AVCaptureResolvedPhotoSettings) }, ParameterByRef = new[] { false, false })]
    [ProtocolMember(IsRequired = false, IsProperty = false, IsStatic = false, Name = "WillCapturePhoto", Selector = "captureOutput:willCapturePhotoForResolvedSettings:", ParameterType = new[] { typeof(AVCapturePhotoOutput), typeof(AVCaptureResolvedPhotoSettings) }, ParameterByRef = new[] { false, false })]
    [ProtocolMember(IsRequired = false, IsProperty = false, IsStatic = false, Name = "DidCapturePhoto", Selector = "captureOutput:didCapturePhotoForResolvedSettings:", ParameterType = new[] { typeof(AVCapturePhotoOutput), typeof(AVCaptureResolvedPhotoSettings) }, ParameterByRef = new[] { false, false })]
    [ProtocolMember(IsRequired = false, IsProperty = false, IsStatic = false, Name = "DidFinishProcessingPhoto", Selector = "captureOutput:didFinishProcessingPhotoSampleBuffer:previewPhotoSampleBuffer:resolvedSettings:bracketSettings:error:", ParameterType = new[] { typeof(AVCapturePhotoOutput), typeof(CMSampleBuffer), typeof(CMSampleBuffer), typeof(AVCaptureResolvedPhotoSettings), typeof(AVCaptureBracketedStillImageSettings), typeof(NSError) }, ParameterByRef = new[] { false, false, false, false, false, false })]
    [ProtocolMember(IsRequired = false, IsProperty = false, IsStatic = false, Name = "DidFinishProcessingRawPhoto", Selector = "captureOutput:didFinishProcessingRawPhotoSampleBuffer:previewPhotoSampleBuffer:resolvedSettings:bracketSettings:error:", ParameterType = new[] { typeof(AVCapturePhotoOutput), typeof(CMSampleBuffer), typeof(CMSampleBuffer), typeof(AVCaptureResolvedPhotoSettings), typeof(AVCaptureBracketedStillImageSettings), typeof(NSError) }, ParameterByRef = new[] { false, false, false, false, false, false })]
    [ProtocolMember(IsRequired = false, IsProperty = false, IsStatic = false, Name = "DidFinishRecordingLivePhotoMovie", Selector = "captureOutput:didFinishRecordingLivePhotoMovieForEventualFileAtURL:resolvedSettings:", ParameterType = new[] { typeof(AVCapturePhotoOutput), typeof(NSUrl), typeof(AVCaptureResolvedPhotoSettings) }, ParameterByRef = new[] { false, false, false })]
    [ProtocolMember(IsRequired = false, IsProperty = false, IsStatic = false, Name = "DidFinishProcessingLivePhotoMovie", Selector = "captureOutput:didFinishProcessingLivePhotoToMovieFileAtURL:duration:photoDisplayTime:resolvedSettings:error:", ParameterType = new[] { typeof(AVCapturePhotoOutput), typeof(NSUrl), typeof(CMTime), typeof(CMTime), typeof(AVCaptureResolvedPhotoSettings), typeof(NSError) }, ParameterByRef = new[] { false, false, false, false, false, false })]
    [ProtocolMember(IsRequired = false, IsProperty = false, IsStatic = false, Name = "DidFinishCapture", Selector = "captureOutput:didFinishCaptureForResolvedSettings:error:", ParameterType = new[] { typeof(AVCapturePhotoOutput), typeof(AVCaptureResolvedPhotoSettings), typeof(NSError) }, ParameterByRef = new[] { false, false, false })]
    [Unavailable(PlatformName.WatchOS, PlatformArchitecture.All, null)]
    [Unavailable(PlatformName.TvOS, PlatformArchitecture.All, null)]
    [Unavailable(PlatformName.MacOSX, PlatformArchitecture.All, null)]
    public interface IAVCapturePhotoCaptureDelegate : INativeObject, IDisposable
    {
    }
}

かなりごちゃごちゃしていますが、悲しいことに全て非常に重要な情報です(笑)。特にNameSelectorなどの情報に注目してください。


次に、AVCapturePhotoCaptureDelegateのメタ情報を見てみましょう

namespace AVFoundation
{
    [Introduced(PlatformName.iOS, 10, 0, PlatformArchitecture.None, null)]
    [Model]
    [Protocol]
    [Register("AVCapturePhotoCaptureDelegate", false)]
    [Unavailable(PlatformName.WatchOS, PlatformArchitecture.All, null)]
    [Unavailable(PlatformName.TvOS, PlatformArchitecture.All, null)]
    [Unavailable(PlatformName.MacOSX, PlatformArchitecture.All, null)]
    public class AVCapturePhotoCaptureDelegate : NSObject, IAVCapturePhotoCaptureDelegate, INativeObject, IDisposable
    {
        [CompilerGenerated]
        [EditorBrowsable(EditorBrowsableState.Advanced)]
        [Export("init")]
        public AVCapturePhotoCaptureDelegate();

        [CompilerGenerated]
        [EditorBrowsable(EditorBrowsableState.Advanced)]
        protected AVCapturePhotoCaptureDelegate(NSObjectFlag t);

        [CompilerGenerated]
        [EditorBrowsable(EditorBrowsableState.Advanced)]
        protected internal AVCapturePhotoCaptureDelegate(IntPtr handle);

        [CompilerGenerated]
        [Export("captureOutput:didCapturePhotoForResolvedSettings:")]
        public virtual void DidCapturePhoto(AVCapturePhotoOutput captureOutput, AVCaptureResolvedPhotoSettings resolvedSettings);

        [CompilerGenerated]
        [Export("captureOutput:didFinishCaptureForResolvedSettings:error:")]
        public virtual void DidFinishCapture(AVCapturePhotoOutput captureOutput, AVCaptureResolvedPhotoSettings resolvedSettings, NSError error);

        [CompilerGenerated]
        [Export("captureOutput:didFinishProcessingLivePhotoToMovieFileAtURL:duration:photoDisplayTime:resolvedSettings:error:")]
        public virtual void DidFinishProcessingLivePhotoMovie(AVCapturePhotoOutput captureOutput, NSUrl outputFileUrl, CMTime duration, CMTime photoDisplayTime, AVCaptureResolvedPhotoSettings resolvedSettings, NSError error);

        [CompilerGenerated]
        [Export("captureOutput:didFinishProcessingPhotoSampleBuffer:previewPhotoSampleBuffer:resolvedSettings:bracketSettings:error:")]
        public virtual void DidFinishProcessingPhoto(AVCapturePhotoOutput captureOutput, CMSampleBuffer photoSampleBuffer, CMSampleBuffer previewPhotoSampleBuffer, AVCaptureResolvedPhotoSettings resolvedSettings, AVCaptureBracketedStillImageSettings bracketSettings, NSError error);

        [CompilerGenerated]
        [Export("captureOutput:didFinishProcessingRawPhotoSampleBuffer:previewPhotoSampleBuffer:resolvedSettings:bracketSettings:error:")]
        public virtual void DidFinishProcessingRawPhoto(AVCapturePhotoOutput captureOutput, CMSampleBuffer rawSampleBuffer, CMSampleBuffer previewPhotoSampleBuffer, AVCaptureResolvedPhotoSettings resolvedSettings, AVCaptureBracketedStillImageSettings bracketSettings, NSError error);

        [CompilerGenerated]
        [Export("captureOutput:didFinishRecordingLivePhotoMovieForEventualFileAtURL:resolvedSettings:")]
        public virtual void DidFinishRecordingLivePhotoMovie(AVCapturePhotoOutput captureOutput, NSUrl outputFileUrl, AVCaptureResolvedPhotoSettings resolvedSettings);

        [CompilerGenerated]
        [Export("captureOutput:willBeginCaptureForResolvedSettings:")]
        public virtual void WillBeginCapture(AVCapturePhotoOutput captureOutput, AVCaptureResolvedPhotoSettings resolvedSettings);

        [CompilerGenerated]
        [Export("captureOutput:willCapturePhotoForResolvedSettings:")]
        public virtual void WillCapturePhoto(AVCapturePhotoOutput captureOutput, AVCaptureResolvedPhotoSettings resolvedSettings);
    }
}

こちらにも、非常に重要な情報が含まれています。先ほどのIAVCapturePhotoCaptureDelegateNameSelectorなどの情報と、こちらのExportの情報を組み合わせて、コンパイル時にiOSのデリゲートが構成される仕組みになっています。深堀してみるとかなりの力技ですね(笑)

長くなりますので今回はここまでにします。

間違いなどございましたらご指摘お願いします。

次回は、具体的にデリゲートを含むコードをどう移植するのかご説明します。

次回はこちらからどうぞ!
hiro128.hatenablog.jp
Cocos Sharp での基本的なゲームの制御の方法 複数のアクションを同時に実行する。

はじめに

こんにちは、@hiro128_777です。

今回は複数のアクションを同時に実行する方法についてご説明します。

複数のアクションを同時に実行するアクション

複数のアクションを同時に実行するには、アクションを複数作成した上で、そのアクションを CCSpawn に登録し、CCNodeRunAction メソッドで実行します。

public CCSpawn(params CCFiniteTimeAction[] actions);

例として
移動、拡大、回転
を同時に行うアクションを作成しましょう。

// 連続して実行したいアクションをそれぞれ作成
var moveByAction = new CCMoveBy(3f, new CCPoint(50f, 100f));
var scaleByAction = new CCScaleBy(3f, 2f);
var rotateByAction = new CCRotateBy(3f, 45f);

// 同時実行するアクションを作成
var spawn = new CCSpawn(moveByAction, scaleByAction, rotateByAction);

// アクション実行
node.RunAction(spawn);

これだけで移動、拡大、回転を同時に行うアクションアクションを実行できます。

とても簡単ですね!

今回はここまでです。

Cocos Sharp 画面遷移のアニメーション (7) CCTransitionSplit*, CCTransitionTurnOffTiles, CCTransitionZoomFlip*

はじめに

こんにちは、@hiro128_777です。
今回も、前回に引き続き Cocos Sharp の画面遷移の際のアニメーションについてご紹介します。

前回はCCTransitionRotoZoom, CCTransitionShrinkGrowCCTransitionSlideIn*のアニメーションをご紹介しました。
hiro128.hatenablog.jp

今回はCCTransitionSplit*, CCTransitionTurnOffTilesCCTransitionZoomFlip*をご紹介します。

言葉で表現するよりも見ていただいたほうが早いので、早速アニメーションを実際に見てみましょう。

画面遷移の際のアニメーション ~CCTransitionSplit*~

CCTransitionSplitCols

f:id:hiro128:20170727101253g:plain

CCTransitionSplitRows

f:id:hiro128:20170727101320g:plain

画面遷移の際のアニメーション ~CCTransitionTurnOffTiles~

CCTransitionTurnOffTiles

f:id:hiro128:20170727101347g:plain

画面遷移の際のアニメーション ~CCTransitionZoomFlip*~

CCTransitionZoomFlipAngular (CCTransitionOrientation.DownOver, CCTransitionOrientation.UpOver, CCTransitionOrientation.LeftOver)

f:id:hiro128:20170727101413g:plain

CCTransitionOrientation.DownOver,CCTransitionOrientation.UpOver,CCTransitionOrientation.LeftOverは同じ動きになります。

CCTransitionZoomFlipAngular (CCTransitionOrientation.RightOver)

f:id:hiro128:20170727101444g:plain

CCTransitionZoomFlipX (CCTransitionOrientation.DownOver, CCTransitionOrientation.UpOver, CCTransitionOrientation.LeftOver)

f:id:hiro128:20170727101521g:plain

CCTransitionOrientation.DownOver,CCTransitionOrientation.UpOver,CCTransitionOrientation.LeftOverは同じ動きになります。

CCTransitionZoomFlipX (CCTransitionOrientation.RightOver)

f:id:hiro128:20170727101557g:plain

CCTransitionZoomFlipY (CCTransitionOrientation.DownOver, CCTransitionOrientation.LeftOver, CCTransitionOrientation.RightOver)

f:id:hiro128:20170727101635g:plain

CCTransitionOrientation.DownOver,CCTransitionOrientation.LeftOver,CCTransitionOrientation.RightOverは同じ動きになります。

CCTransitionZoomFlipY (CCTransitionOrientation.UpOver)

f:id:hiro128:20170727101714g:plain


というわけで、色々なアニメーションがありますので、皆さんも、色々試してみてください!

また、画面遷移のアニメーションのご紹介は今回で終了です。

では、今回はここまでです。

Cocos Sharp ハンズオン(2)地図のアニメーション設定

はじめに

こんにちは、@hiro128_777です。


前回は地図が表示される部分までを作成しました。今回はハンズオン用のテキスト後半部分です。ボタンをタップすると地図がアニメーションする部分を作成していきます。

この記事からご覧になった方は、前回からご覧になることをお勧めします。

hiro128.hatenablog.jp

ハンズオン続き

それではさっそく続きを始めましょう。

アニメーションを追加 : GameLayer.cs

GameLayer.csにアニメーション用のフィールドを追加します。

CCActionStateはアニメーションの動作中、終了のステータス管理、CCBlinkCCScaleByなどはアニメーションを表すオブジェクトです。

private CCActionState tokyoActionState;
private CCActionState kanagawaActionState;
private CCActionState saitamaActionState;
private CCActionState chibaActionState;
private CCActionState gunmaActionState;
private CCActionState tochigiActionState;
private CCActionState ibarakiActionState;

private CCBlink blink;
private CCScaleBy scaleLarge;
private CCEaseBackIn easedScaleLarge;
private CCRotateBy rotate;
private CCEaseBounceIn easedRotate;
private CCScaleBy scaleOrigin;

次にGameLayer.csのコンストラクタにアニメーションのインスタンスを作成するコードを追加します。

blink = new CCBlink(2, 10); 
scaleLarge = new CCScaleBy(1, 4); 
easedScaleLarge = new CCEaseBackIn(scaleLarge); 
rotate = new CCRotateBy(3, 2880); 
easedRotate = new CCEaseBounceIn(rotate); 
scaleOrigin = new CCScaleBy(1, 0.25f); 

さらにGameLayer.csに各県ごとの、アニメーションの実行可否判断用のプロパティとアニメーションの実行用のメソッドを追加します。

実行可否判断は現在実行中のアニメーションが終了するまで次のアニメーションを実行させないようにするために使用します。

public bool CanPlayAnimationTokyo
{
	get { return tokyoActionState == null ? true : tokyoActionState.IsDone; }
}

public void PlayAnimationTokyo()
{
	if (!CanPlayAnimationTokyo)
		return;

	var sequence = new CCSequence(
		new CCCallFunc(() => tokyoSprite.ZOrder = 1000),
		blink,
		easedScaleLarge,
		easedRotate,
		scaleOrigin,
		new CCCallFunc(() => tokyoSprite.ZOrder = 0)
		);
	tokyoActionState = tokyoSprite.RunAction(sequence);
}

public bool CanPlayAnimationKanagawa
{
	get { return kanagawaActionState == null ? true : kanagawaActionState.IsDone; }
}

public void PlayAnimationKanagawa()
{
	if (!CanPlayAnimationKanagawa)
		return;

	var sequence = new CCSequence(
		new CCCallFunc(() => kanagawaSprite.ZOrder = 1000),
		blink,
		easedScaleLarge,
		scaleOrigin,
		new CCCallFunc(() => kanagawaSprite.ZOrder = 0)
		);
	kanagawaActionState = kanagawaSprite.RunAction(sequence);
}

public bool CanPlayAnimationSaitama
{
	get { return saitamaActionState == null ? true : saitamaActionState.IsDone; }
}

public void PlayAnimationSaitama()
{
	if (!CanPlayAnimationSaitama)
		return;

	var sequence = new CCSequence(
		new CCCallFunc(() => saitamaSprite.ZOrder = 1000),
		blink,
		scaleLarge,
		rotate,
		scaleOrigin,
		new CCCallFunc(() => saitamaSprite.ZOrder = 0)
		);
	saitamaActionState = saitamaSprite.RunAction(sequence);
}

public bool CanPlayAnimationChiba
{
	get { return chibaActionState == null ? true : chibaActionState.IsDone; }
}

public void PlayAnimationChiba()
{
	if (!CanPlayAnimationChiba)
		return;

	var sequence = new CCSequence(
		new CCCallFunc(() => chibaSprite.ZOrder = 1000),
		easedScaleLarge,
		scaleOrigin,
		new CCCallFunc(() => chibaSprite.ZOrder = 0)
		);
	chibaActionState = chibaSprite.RunAction(sequence);
}

public bool CanPlayAnimationGunma
{
	get { return gunmaActionState == null ? true : gunmaActionState.IsDone; }
}

public void PlayAnimationGunma()
{
	if (!CanPlayAnimationGunma)
		return;

	var sequence = new CCSequence(blink);
	gunmaActionState = gunmaSprite.RunAction(sequence);
}

public bool CanPlayAnimationTochigi
{
	get { return tochigiActionState == null ? true : tochigiActionState.IsDone; }
}

public void PlayAnimationTochigi()
{
	if (!CanPlayAnimationTochigi)
		return;

	var sequence = new CCSequence(
		new CCCallFunc(() => tochigiSprite.ZOrder = 1000),
		scaleLarge,
		scaleOrigin,
		new CCCallFunc(() => tochigiSprite.ZOrder = 0)
		);
	tochigiActionState = tochigiSprite.RunAction(sequence);
}

public bool CanPlayAnimationIbaraki
{
	get { return ibarakiActionState == null ? true : ibarakiActionState.IsDone; }
}

public void PlayAnimationIbaraki()
{
	if (!CanPlayAnimationIbaraki)
		return;

	var sequence = new CCSequence(
		new CCCallFunc(() => ibarakiSprite.ZOrder = 1000),
		rotate,
		new CCCallFunc(() => ibarakiSprite.ZOrder = 0)
		);
	ibarakiActionState = ibarakiSprite.RunAction(sequence);
}


この部分もう少し詳しく解説します。

CanPlayAnimationTokyoプロパティでは、アニメーションのステータスを確認し、アニメーション実行前、または終了後であれば、実行許可を許可します。

public bool CanPlayAnimationTokyo
{
	get { return tokyoActionState == null ? true : tokyoActionState.IsDone; }
}


PlayAnimationTokyoメソッドでは、以下のような処理を行っています。


実行許可が出ていなければアニメーションを実行しません。

if (!CanPlayAnimationTokyo)
	return;

個別のアニメーションを連続実行するように組み合わせ、連続したアニメーションを構築します。

アニメーション時に最前面にないと他のスプライトの後ろに隠れたりしますので、最初に今回アニメーションするスプライトを最前面に移動させ、終了後元に戻しています。

CCSequenceはアニメーションを連続的に実行しますが、CCSpawnでは複数のアニメーションを同時実行できます。

CCEaseBackInなどを使うことによって通常はリニアなアニメーションの変化量を関数的に変化するように装飾できます。

var sequence = new CCSequence(
	new CCCallFunc(() => tokyoSprite.ZOrder = 1000),
	blink,
	easedScaleLarge,
	easedRotate,
	scaleOrigin,
	new CCCallFunc(() => tokyoSprite.ZOrder = 0)
	);

アニメーションをスプライトに紐づけて実行し、実行状況を参照できるようにします。

tokyoActionState = tokyoSprite.RunAction(sequence);

GameLayerの操作メソッドをViewModelに公開する : GameScene.cs

GameSceneGameLayerCanPlayAnimationTokyoなどのアニメーション実行メソッドをViewModelに公開するためのメソッドを追加します。

public void PlayAnimationTokyo()
{
	layer.PlayAnimationTokyo();
}

public void PlayAnimationKanagawa()
{
	layer.PlayAnimationKanagawa();
}

public void PlayAnimationSaitama()
{
	layer.PlayAnimationSaitama();
}

public void PlayAnimationChiba()
{
	layer.PlayAnimationChiba();
}

public void PlayAnimationGunma()
{
	layer.PlayAnimationGunma();
}

public void PlayAnimationTochigi()
{
	layer.PlayAnimationTochigi();
}

public void PlayAnimationIbaraki()
{
	layer.PlayAnimationIbaraki();
}

ViewModelのCommandのデリゲートを設定する : MainPageViewModel.cs

MainPageViewModelDelegateCommandGameSceneのアニメーション起動メソッドを設定します。

public DelegateCommand TokyoCommand => new DelegateCommand(() => GameScene.PlayAnimationTokyo());
public DelegateCommand KanagawaCommand => new DelegateCommand(() => GameScene.PlayAnimationKanagawa());
public DelegateCommand SaitamaCommand => new DelegateCommand(() => GameScene.PlayAnimationSaitama());
public DelegateCommand ChibaCommand => new DelegateCommand(() => GameScene.PlayAnimationChiba());
public DelegateCommand GunmaCommand => new DelegateCommand(() => GameScene.PlayAnimationGunma());
public DelegateCommand TochigiCommand => new DelegateCommand(() => GameScene.PlayAnimationTochigi());
public DelegateCommand IbarakiCommand => new DelegateCommand(() => GameScene.PlayAnimationIbaraki());

確認

以上でプログラムは完成しました!
ボタンをタップすると地図がアニメーションするか試してみましょう。


f:id:hiro128:20170704201300g:plain


いかがでしょうか!これで Cocos Sharp の基本的な使い方はバッチリです!

この後は完成したサンプルをアレンジしてみましょう!

プラクティス

  • アニメーションの種類を変更してみましょう。

CCMoveByCCMoveTo 移動
CCScaleByCCScaleTo 拡大・縮小
CCRotateByCCRotateTo 回転
CCJumpByCCJumpTo ジャンプ
CCFadeInCCFadeOutCCFadeTo フェード
CCTintByCCTintTo 色合いを変化
CCSkewByCCSkewTo ゆがませる
CCBlink 点滅させる


  • CCSequenceの代わりにCCSpawnを使ってみましょう。


  • 動きにイージングを適用してみましょう。

CCEaseInCCEaseOutCCEaseInOut
CCEaseExponentialInCCEaseExponentialOutCCEaseExponentialInOut
CCEaseSineInCCEaseSineOutCCEaseSineInOut


CCEaseElasticInCCEaseElasticOutCCEaseElasticInOut
CCEaseBounceInCCEaseBounceOutCCEaseBounceInOut
CCEaseBackInCCEaseBackOutCCEaseBackInOut

Cocos Sharp ハンズオン(1)地図の表示

はじめに

こんにちは、@hiro128_777です。


今回は JXUGC #23 でお見せした関東地方の地図がぐりぐり動くサンプルアプリを作成できるようにハンズオン用のテキストを作成しました。
オフラインでハンズオンも実施しますが、参加できない方でも、こちらを参考にすればサンプルアプリを作成できますので、ご興味がある方はぜひ試してみてください。

f:id:hiro128:20170623155841p:plain

完成版のソースコードはこちら

github.com

今回のゴール

Xamarin.Forms 上で Cocos Sharp のアニメーションが動かせるようになる!

ハンズオンを始める前に

Cocos Sharp について

「Cocos Sharp って何??」という方はこちらをご一読ください。

hiro128.hatenablog.jp

Cocos Sharp の基本的な使い方

まずは Cocos Sharp の基本的な使い方をご説明します。

Cocos Sharp の画面の階層構造

こちらをご覧ください。

hiro128.hatenablog.jp
Cocos Sharp のオブジェクトの制御 スケジューラ

こちらをご覧ください。

hiro128.hatenablog.jp
Cocos Sharp のオブジェクトの制御 アクション

こちらをご覧ください。

hiro128.hatenablog.jp
Cocos Sharp のオブジェクトの制御 連続したアクション

こちらをご覧ください。

hiro128.hatenablog.jp

ハンズオン

それでは、早速アプリを作っていきましょう!

Prism Template Pack のインストール、Prism for Xamarin.Forms 適用済みのソリューションの作成

まずはソリューションを作成します。
手順はこちらをご覧ください。

hiro128.hatenablog.jp


Visual studio for Mac では Prism Template Pack がインストールできないので
以下の作成済みのソリューションをご利用下さい。

github.com

Cocos Sharp のインストール

次にCocos Sharpをインストールします。
手順はこちらをご覧ください。

hiro128.hatenablog.jp

ViewModelの作成 : MainPageViewModel.cs

ViewModels/MainPageViewModel.cs を下記のように書き換えてください。

Cocos Sharp のキャンバスGameSceneのプロパティを作成し、各県ごとのコマンドにダミーのデリゲートを設定しておきます。

using Prism.Commands;
using Prism.Mvvm;
using Prism.Navigation;

namespace CocosHandsOn01.ViewModels
{
	public class MainPageViewModel : BindableBase
	{

		public GameScene GameScene { get; set; }

		public DelegateCommand TokyoCommand => new DelegateCommand(() => { });
		public DelegateCommand KanagawaCommand => new DelegateCommand(() => { });
		public DelegateCommand SaitamaCommand => new DelegateCommand(() => { });
		public DelegateCommand ChibaCommand => new DelegateCommand(() => { });
		public DelegateCommand GunmaCommand => new DelegateCommand(() => { });
		public DelegateCommand TochigiCommand => new DelegateCommand(() => { });
		public DelegateCommand IbarakiCommand => new DelegateCommand(() => { });

		private INavigationService navigationService;

		public MainPageViewModel(INavigationService navigationService)
		{
			this.navigationService = navigationService;
		}

	}
}

画面に地図を表示する

XAMLの作成 : MainPage.xaml

Views/MainPage.xaml を下記のように書き換えてください。

<?xml version="1.0" encoding="utf-8" ?>
<ContentPage xmlns="http://xamarin.com/schemas/2014/forms"
			 xmlns:x="http://schemas.microsoft.com/winfx/2009/xaml"
			 xmlns:prism="clr-namespace:Prism.Mvvm;assembly=Prism.Forms"
			 prism:ViewModelLocator.AutowireViewModel="True"
			 Title="関東地方"
			 x:Class="CocosHandsOn01.Views.MainPage">
	<Grid x:Name="MainGrid" RowSpacing="0">
		<Grid.RowDefinitions>
			<RowDefinition Height="*"/>
			<RowDefinition Height="*"/>
		</Grid.RowDefinitions>
		<StackLayout Grid.Column="0" Grid.Row="1" Padding="10,7,10,0" Margin="0,0,0,0" VerticalOptions="FillAndExpand" Orientation="Vertical">
			<StackLayout.Spacing>
				<OnPlatform x:TypeArguments="x:Double">
					<OnPlatform.iOS>7</OnPlatform.iOS>
					<OnPlatform.Android>0</OnPlatform.Android>
				</OnPlatform>
			</StackLayout.Spacing>
			<Button HeightRequest="35" BackgroundColor="Gray" TextColor="White" Text="群馬県" FontSize="Micro" Command="{Binding GunmaCommand}" />
			<Button HeightRequest="35" BackgroundColor="Gray" TextColor="White" Text="栃木県" FontSize="Micro" Command="{Binding TochigiCommand}" />
			<Button HeightRequest="35" BackgroundColor="Gray" TextColor="White" Text="茨城県" FontSize="Micro" Command="{Binding IbarakiCommand}" />
			<Button HeightRequest="35" BackgroundColor="Gray" TextColor="White" Text="千葉県" FontSize="Micro" Command="{Binding ChibaCommand}" />
			<Button HeightRequest="35" BackgroundColor="Gray" TextColor="White" Text="埼玉県" FontSize="Micro" Command="{Binding SaitamaCommand}" />
			<Button HeightRequest="35" BackgroundColor="Gray" TextColor="White" Text="神奈川県" FontSize="Micro" Command="{Binding KanagawaCommand}" />
			<Button HeightRequest="35" BackgroundColor="Gray" TextColor="White" Text="東京都" FontSize="Micro" Command="{Binding TokyoCommand}" />
		</StackLayout>
	</Grid>
</ContentPage>

XAMLは通常の Xamarin.Forms の場合と何も変わりません。上下2段のGridが配置してあり、下のセルにボタンが配置されています。
CocosSharp のコントロールは XAML 上には配置されていません。CocosSharp のコントロールは XAML 上で追加すると落ちるため、後ほどコードビハインドで追加します。

コードビハインド : MainPage.xaml


usingを以下のように書き換えます。

using System;
using System.Collections.Generic;
using Xamarin.Forms;
using CocosSharp;
using CocosHandsOn01.ViewModels;


コンストラクタを以下のように書き換えます。
InitializeComponentの後にCocosSharpViewのコントロールを作成し配置します。。

public MainPage()
{
	InitializeComponent();

	var grid = this.FindByName<Grid>("MainGrid");

	var gameView = new CocosSharpView()
	{
		HorizontalOptions = LayoutOptions.FillAndExpand,
		VerticalOptions = LayoutOptions.FillAndExpand,
		ViewCreated = CocosSharpView_ViewCreated
	};
	grid.Children.Add(gameView, 0, 0);
}


下記のイベントハンドラを追加します。
CocosSharpViewの生成時にゲーム画面CCGameViewの初期設定を行います。

private void CocosSharpView_ViewCreated(object sender, EventArgs e)
{
	var gameView = sender as CCGameView;

	if (gameView != null)
	{
		gameView.DesignResolution = new CCSizeI(350, 300);
		gameView.ResolutionPolicy = CCViewResolutionPolicy.ShowAll;
		gameView.ContentManager.SearchPaths = new List<string> { "Images" };
		var gameScene = new GameScene(gameView);
		gameView.RunWithScene(gameScene);
		var viewModel = BindingContext as MainPageViewModel;
		viewModel.GameScene = gameScene;
	}
}

参考

ゲーム画面の初期化の内容を具体的に見ていきましょう。

gameView.DesignResolution = new CCSizeI(350, 300);

ゲーム内の仮想解像度を横350ユニット、縦300ユニットに設定します。

gameView.ResolutionPolicy = CCViewResolutionPolicy.ExactFit;

アスペクト比を保ったまま最大の大きさで表示します。

gameView.ContentManager.SearchPaths = new List<string> { "Images" };

アセットを探しに行くパスを設定します。

var viewModel = BindingContext as MainPageViewModel;
viewModel.GameScene = gameScene;

また、ViewModel側からゲーム操作できるように参照を渡しています。この部分本当は疎結合にしたいのですが、現状では厳しそうな感じです。

アセットの配置

Imageファイルをプラットフォームごとのプロジェクトに配置します。

Imageファイルは以下をご利用ください。

tokyo.png
f:id:hiro128:20170627155409p:plain


kanagawa.png
f:id:hiro128:20170627155654p:plain


saitama.png
f:id:hiro128:20170627155701p:plain


chiba.png
f:id:hiro128:20170627155711p:plain


gunma.png
f:id:hiro128:20170627155719p:plain


tochigi.png
f:id:hiro128:20170627155732p:plain


ibaraki.png
f:id:hiro128:20170627155747p:plain


iOSの場合

Content/Images の中にpngファイルを配置してください。

f:id:hiro128:20170627181950p:plain

pngファイルのビルドアクションはBundleResourceに設定してください。

f:id:hiro128:20170627182303p:plain

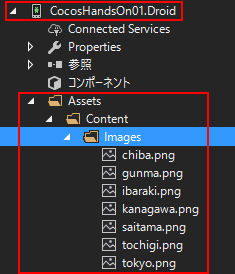
Androidの場合

Assets/Content/Images の中にpngファイルを配置してください。

f:id:hiro128:20170627184434p:plain

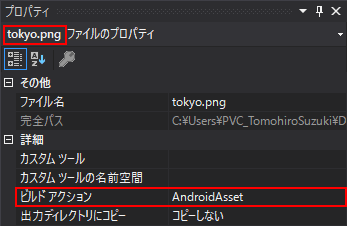
pngファイルのビルドアクションはAndroidAssetに設定してください。

f:id:hiro128:20170627184443p:plain

レイヤーの作成 : GameLayer

CocosSharp では、キャンパスであるCCSceneの中に、グラフィックレイヤーであるCCLayerを配置し、その中に動くオブジェクトCCSpriteを配置します。

最初にCCLayer上にそれぞれの県のCCSpriteを配置します。

using System;
using System.Diagnostics;
using CocosSharp;

namespace CocosHandsOn01
{
	public class GameLayer : CCLayerColor
	{
		private CCTexture2D tokyoTexture;
		private CCTexture2D kanagawaTexture;
		private CCTexture2D saitamaTexture;
		private CCTexture2D chibaTexture;
		private CCTexture2D gunmaTexture;
		private CCTexture2D tochigiTexture;
		private CCTexture2D ibarakiTexture;

		private CCSprite tokyoSprite;
		private CCSprite kanagawaSprite;
		private CCSprite saitamaSprite;
		private CCSprite chibaSprite;
		private CCSprite gunmaSprite;
		private CCSprite tochigiSprite;
		private CCSprite ibarakiSprite;

		public GameLayer(CCColor4B? color = default(CCColor4B?)) : base(color)
		{
			tokyoTexture = new CCSprite("tokyo.png", null).Texture;
			kanagawaTexture = new CCSprite("kanagawa.png", null).Texture;
			saitamaTexture = new CCSprite("saitama.png", null).Texture;
			chibaTexture = new CCSprite("chiba.png", null).Texture;
			gunmaTexture = new CCSprite("gunma.png", null).Texture;
			tochigiTexture = new CCSprite("tochigi.png", null).Texture;
			ibarakiTexture = new CCSprite("ibaraki.png", null).Texture;

			var offsetX = 50f;

			tokyoSprite = new CCSprite(tokyoTexture)
			{
				PositionX = 96.25f + offsetX,
				PositionY = 126.25f,
				Scale = 0.3f,
				Tag = (int)Prefecture.Tokyo,
			};
			AddChild(tokyoSprite);

			kanagawaSprite = new CCSprite(kanagawaTexture)
			{
				PositionX = 90f + offsetX,
				PositionY = 93f,
				Scale = 0.3f,
				Tag = (int)Prefecture.Kanagawa,
			};
			AddChild(kanagawaSprite);

			saitamaSprite = new CCSprite(saitamaTexture)
			{
				PositionX = 84.5f + offsetX,
				PositionY = 163f,
				Scale = 0.3f,
				Tag = (int)Prefecture.Saitama,
			};
			AddChild(saitamaSprite);

			chibaSprite = new CCSprite(chibaTexture)
			{
				PositionX = 177.5f + offsetX,
				PositionY = 104f,
				Scale = 0.3f,
				Tag = (int)Prefecture.Chiba,
			};
			AddChild(chibaSprite);

			gunmaSprite = new CCSprite(gunmaTexture)
			{
				PositionX = 60f + offsetX,
				PositionY = 220f,
				Scale = 0.3f,
				Tag = (int)Prefecture.Gunma,
			};
			AddChild(gunmaSprite);

			tochigiSprite = new CCSprite(tochigiTexture)
			{
				PositionX = 131f + offsetX,
				PositionY = 238f,
				Scale = 0.3f,
				Tag = (int)Prefecture.Tochigi,
			};
			AddChild(tochigiSprite);

			ibarakiSprite = new CCSprite(ibarakiTexture)
			{
				PositionX = 174.5f + offsetX,
				PositionY = 200f,
				Scale = 0.3f,
				Tag = (int)Prefecture.Ibaraki,
			};
			AddChild(ibarakiSprite);

		}

	}

	public enum Prefecture
	{
		Tokyo,
		Kanagawa,
		Saitama,
		Chiba,
		Gunma,
		Tochigi,
		Ibaraki
	}

}

シーンの作成

CCScene上に今作成したCCLayerを配置します。

using System;
using CocosSharp;

namespace CocosHandsOn01
{
	public class GameScene : CCScene
	{
		GameLayer layer;

		public GameScene(CCGameView gameView) : base(gameView)
		{
			layer = new GameLayer(CCColor4B.Black);
			AddLayer(layer);
		}
	}
}

確認

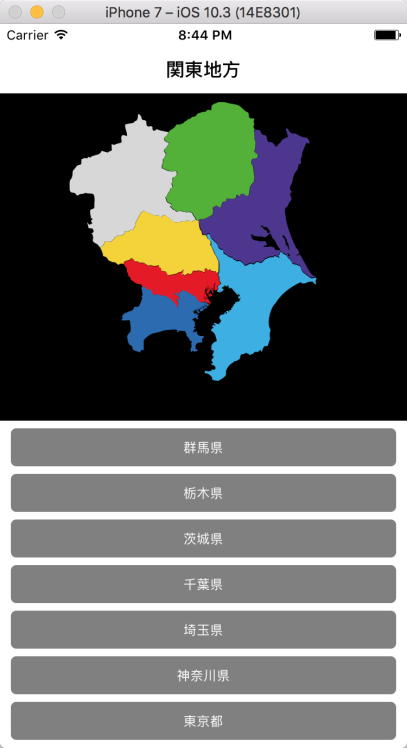
ここまでをデバッグ実行すると画面上に地図が表示されるはずです。確認してみましょう。

f:id:hiro128:20170628205102p:plain

f:id:hiro128:20170628204258p:plain